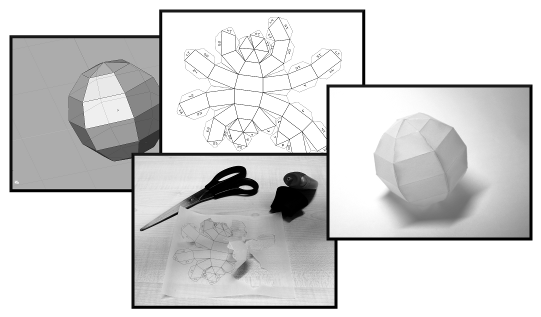
What
is DXF2papercraft?
Papercraft
models are 3D models built from paper or cardboard. They
should not be confused with Origami. Though Origami also
aims at producing 3D shapes from sheets of paper,
papercraft models involve cutting a so-called cut-out
sheet and connecting faces using glue. It is mainly used
to create solid objects with an explicit interior and
exterior being completely separated by the paper.
Sometimes,
papercraft models are reinforced by fiber glass and
resin to obtain a rigid, resilient structure.
DXF2papercraft
converts a polygonal 3D model stored as DXF file into a
plain drawing in the form of a 2D DXF file. This
requires to 'unfold'
the model. The
result is a flattened pattern of connected polygons. All
edges of a polygon which are unconnected get a so called
glue-tab in addition. The tabs are numbered such that
each one has a counterpart with the same number. After
all pairs of tabs have been glued together the paper
model corresponds to the 3D object.
DXF2papercraft is a
simple command-line tool. In order to create a polygonal
3D model you need to use a so-called 3D modelling
program which can export shapes as DXF file. All models
on this page have been created with 'blender' which is
free of charge. Then, the resulting 2D DXF file has to
be loaded, e.g., with OpenOffice, scaled to fit onto a
sheet as desired and printed as hard-copy. Normal paper
can be used as well as tracing paper or rice paper in
order to produce a
semi-translucent
effect.
|
How to
install dxf2papercraft?
If you use the statically linked version which comes
with the archive, start the application from its
directory on the command line (prompt) immediately.
As a first test you may want to convert one of the
examples provided
> dxf2papercraft
examples/mycubes.dxf testsheet.dxf
Open the resulting cutout-sheet testsheet.dxf, e.g.,
with libreoffice.
if you have LibreOffice
installed. You can also use any other application which
can import 2D DXF files.
How to compile dxf2papercraft?
Linux:
The executable binary version of dxf2papercraft has been
linked statically to omit problems with the dime library
so you don't need any additional packages. If you want
to compile dxf2papercraft from the sources you need to
install libdime.
On Ubuntu or Debian the following should do:
> sudo apt-get install libdime libdime-dev
For other distributions, please use your respective packet manager.
You can also compile the included version dime_0.20091127.tar.gz
from scratch:
> tar xzf dime_0.20091127.tar.gz
> cd dime
> ./configure --enable-static
> make
> sudo make install
dxf2papercraft itself is simply compiled with
> make
in its dxf2papercraft-directory.
Windows:
The contained executable has been built using cygwin which you should
also install for easy compilation. The zip-archive
basically contains the same source files as the
tgz-version with minor changes in the Makefile. You can
compile your own windows executable as follows:
> tar xzf dime_0.20091127.tar.gz
> cd dime
> ./configure --enable-static --disable-msvc
> make
> cd ..
> make
|
Quick-Start
1)
|
Download and
install Blender
or any 3D modelling software of your choice
which can export DXF files. Alternatively, use
one of the DXF models included in the
tar-archive and continue with step 3). |
2)
|
Create a simple
polygonal 3D shape. Blender shows a cube by
default. You may want to delete it in case you
want to create more complex shapes. |
3)
|
Download
DXF2papercraft and convert your DXF-file on the
command line (command prompt):
dxf2papercraft examples/torus.dxf sheet.dxf |
4)
|
Install LibreOffice,
qcad
or any other application which can display dxf
files and import 'sheet.dxf'. You may have to
scale the polygon mesh prior to print-out.
|
5)
|
Cut the polygon
mesh from your cut-out sheet. In addition to
classical scissors as a tool, try a card-board
knife and a ruler for faster cutting. Use a
sheet of papers or an old magazine as underlay. |
6)
|
Now you need to
fold the model along all edges. When using a
knife, slightly slit the folding edges with the
blade but do not cut through. The slitting can
make the subsequent folding easier and more
precise. Fold all edges of the model and of the
glue tabs. |
7)
|
Glue tabs
always come in pairs. Matching pairs can be
identified by matching numbers. Depending on
your type of glue used, apply it either on one
tab only or on both. Glue some consecutive tabs
in a row and allow them to dry for a |
|
